

Where Do I Find A Listing Of Registed Accounts In Woocommerce?
User Registration for WooCommerce allows yous to automate your wholesale registration organization for B2B and wholesale customers with the employ of a registration course builder making user approving unproblematic and like shooting fish in a barrel.
Installation Guide ↑ Back to pinnacle
- Download the User Registration for WooCommerce.zip file from your WooCommerce business relationship.
- Go to:WordPress Admin > Plugins > Add New andUpload Plugin.
- Choose File for the file you downloaded in step1.
- Install Nowand ActivatePlugin.
Getting Started ↑ Dorsum to top
Registration Form ↑ Back to top
- Navigate to WordPress Admin Dashboard → WooCommerce → Registration Form.
- Once you're on the Registration Form page, yous'll run into 3 tabs on this page.
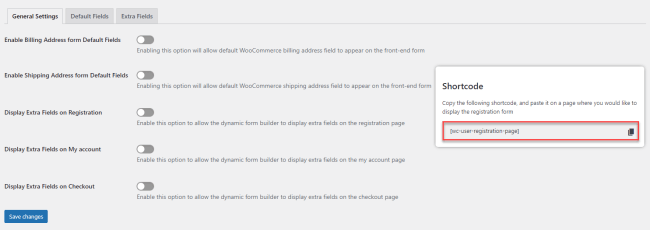
- Once you're on the Registration Form page, you lot'll see a Shortcode on the right side of the page.
- This shortcode volition enable the User Registration functionality where pasted.
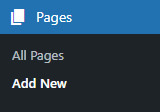
- Copy the shortcode and navigate to WordPress Admin Dashboard → Pages → Add New.
- A new page would open.
- Add the Title of the page.
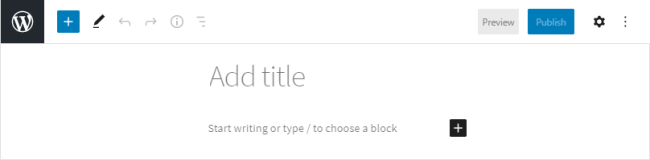
- Click on the sign ➕ to add blocks.
- Select the Shortcode element.
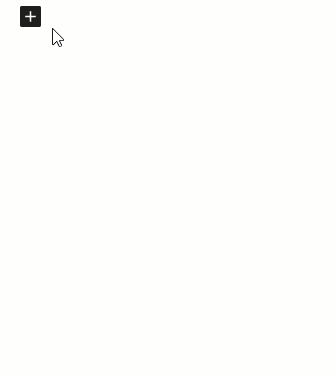
In one case done, we can encounter that a shortcode [wc-user-registration-page] will exist added to the page.

- Click on the Publish button.
- Now go back to the Registration Form page by navigating to WordPress Admin Dashboard → WooCommerce → Registration Form.
- In one case you're on the Registration Course page, you'll see three tabs on this folio.
- Full general Settings
- Default Fields
- Extra Fields
A. General Settings ↑ Dorsum to top
- Navigate to the General Settings tab. (The Admin will be redirected on the Full general Settings tab by default when you're on the Registration Form folio).
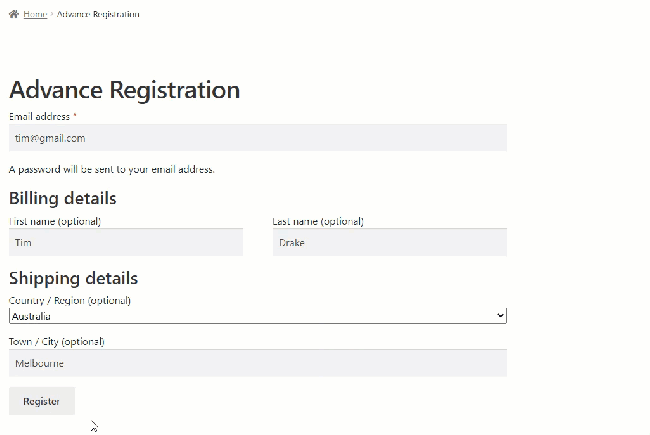
- Enable Billing Address form Default Fields
Enable this option to display the Billing Accost on the User Registration folio.
two. Enable Shipping Address form Default Fields
Enable this option to display the Aircraft Address on the User Registration.
three. Display Extra Fields on Registration
Enable this option to allow the dynamic form architect to display actress fields on the User Registration.
4. Brandish Extra Fields on Registration
Enable this option to allow the dynamic class builder to display extra fields on the My Account page.
5. Display Extra Fields on Registration
Enable this pick to allow the dynamic class architect to display extra fields on the Checkout page.
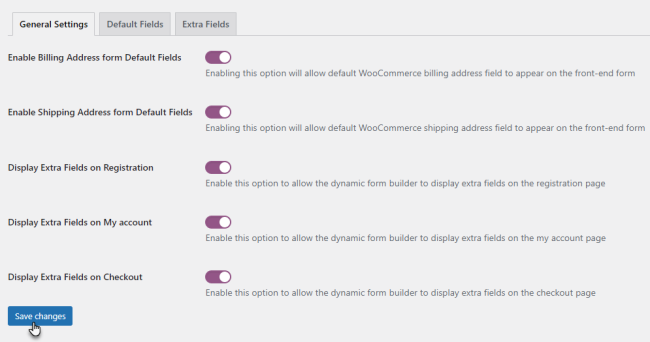
- Click on the Save changes push button to utilise your settings.
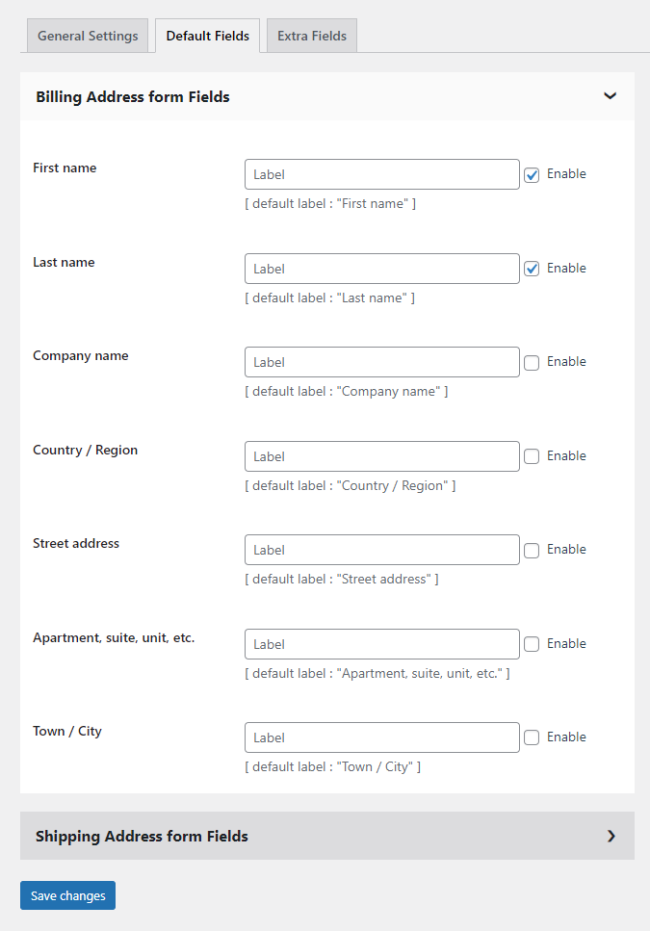
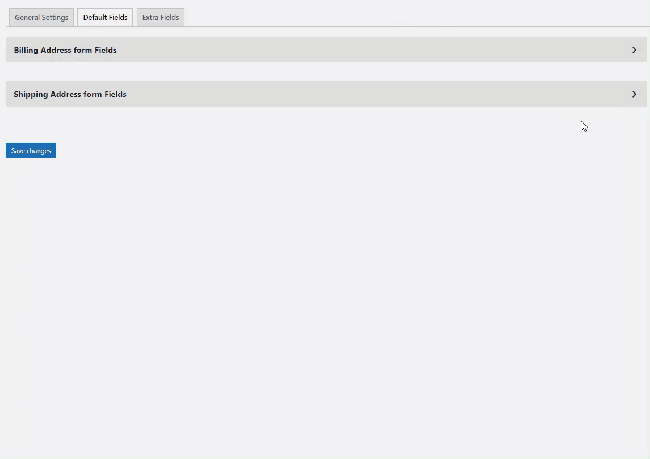
B. Default Fields ↑ Dorsum to meridian
- Navigate to the Default Settings tab.
- In that location are two accordions in this tab.
- Billing Address form Fields
- Click on Billing Address form Fields accordion to expand information technology.
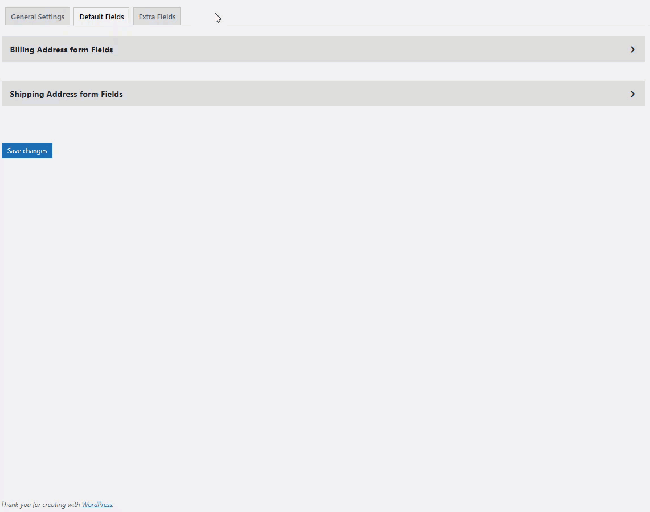
- Checkmark the Enable checkbox against the fields you want to display in the Billing Accost section on the registration course.
2. Aircraft Accost form Fields
- Click on Aircraft Address class Fields accordion to expand it.
- Checkmark the Enable checkbox against the fields you desire to display in the Shipping Address section on the registration form.
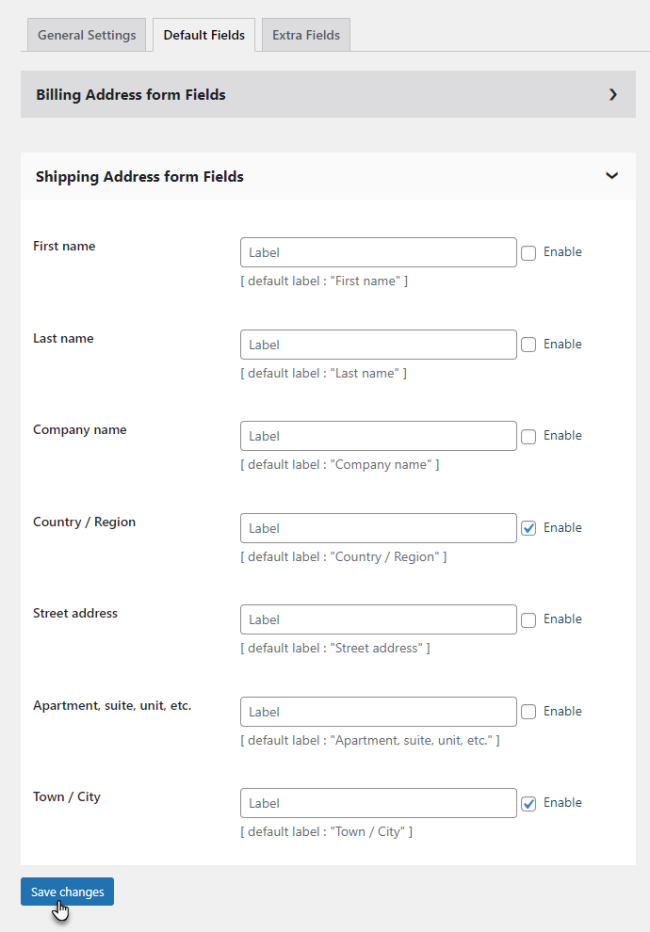
- Click on the Save changes push button to employ your settings.
Front-Terminate Touch on:
- On the website, go to the User Registration folio.
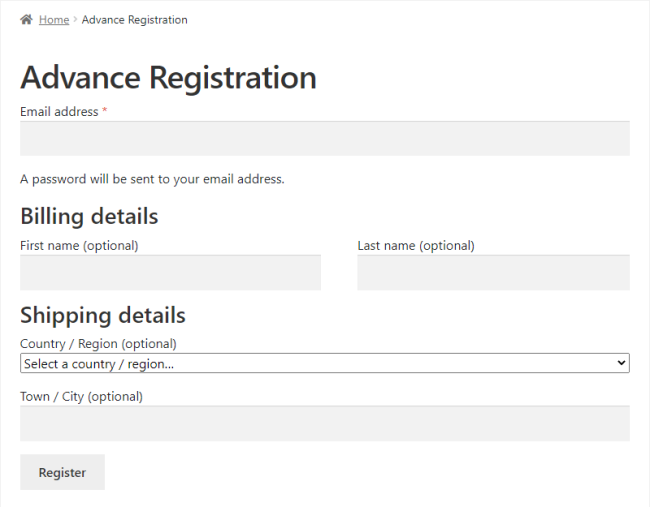
Note: The fields selected in the Billing Address form Fields and Shipping Address form Fields accordion will only exist displayed on the Registration class if the Enable Billing Accost form Default Fields and Enable Shipping Accost grade Default Fields options are enabled in the General Settings tab.
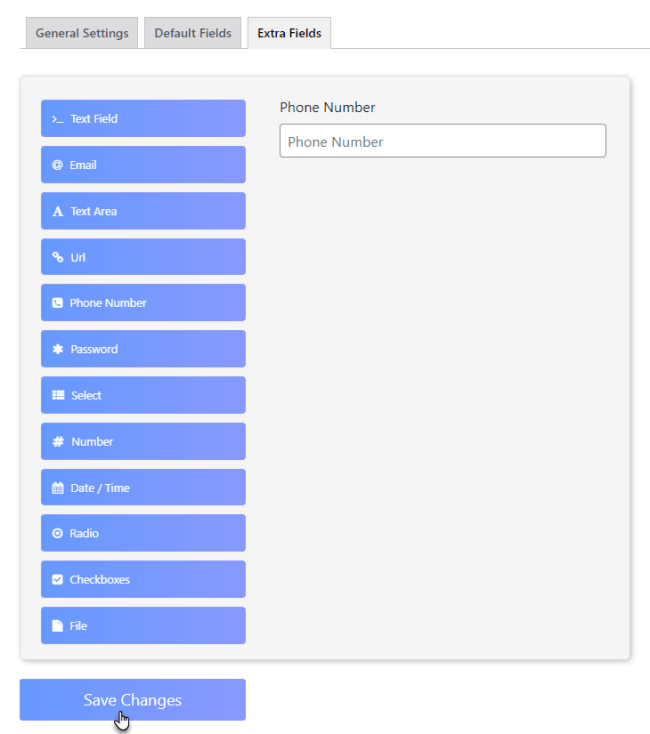
C. Extra Fields ↑ Dorsum to superlative
The admin has the choice to add the following extra field to their user registration course:
- Text
- Electronic mail
- Text Expanse
- URL
- Phone number
- Countersign
- Select
- Number
- Appointment/Time
- Radio buttons
- Checkboxes
- File
How to add together extra fields to the user registration form architect?
- Navigate to the Extra Fields tab.
- In one case done, you're on the Form Architect page.

- This form allows you to drag and drib components on your Course.
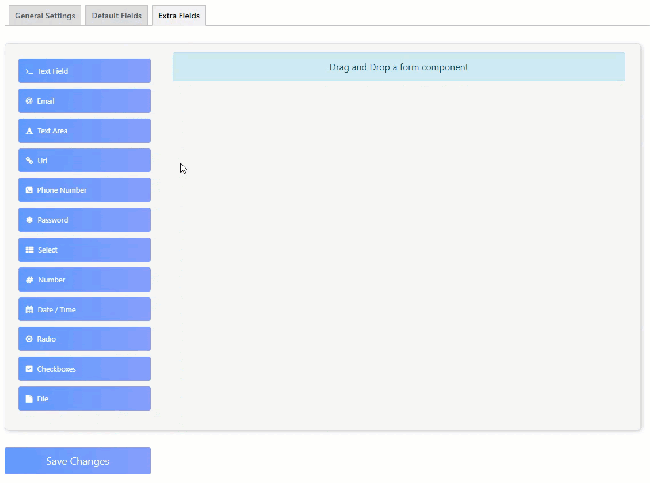
- One time you've added all the fields, click on the Save Changes button to save your class.
User registration form builder – extra fields features
Display
Set the Display by below features where users can add extra fields by their requirements.

- Set the Label to display to a higher place the field.
- Set up the Label position by:
- Top
- Left (Left-aligned)
- Left Right-aligned)
- Right (Left-aligned)
- Correct (Right-aligned)
- Set the placeholder and it displays when the field is empty.
- Set the description text that will appear beneath the input field.
- By Adding a tooltip to the side of this field.
- A brandish mask helps to brandish the input in a readable way, which is not editable.
- Users can add Custom CSS to this component.
- By setting the autocomplete, it Indicates whether input elements tin by default have their values automatically completed by the browser.
- By checking the subconscious box to hide the field.
- By checking the hide label box to hibernate the label.
- Past checking the Allow spellcheck box to correct the text.
- Past checking the disabled box to disable the text.
Data

- Admin can set the default data value in the text field.
Validation

- Validate on by change or mistiness.
- Set the minimum word length.
- Set the maximum word length.
Conditional

- Admin can gear up the status of the field past true or false.
- By adding the status of another field.
- Set up the condition by the given value.
Front-End Impact
- On the website, go to the User Registration page.

User Roles ↑ Back to summit
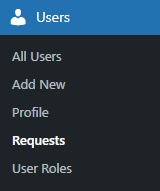
- Navigate to WordPress Admin Dashboard → Users → User Roles.
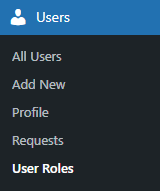
- At present yous're on the User Roles folio.
- There are two sections on this folio.
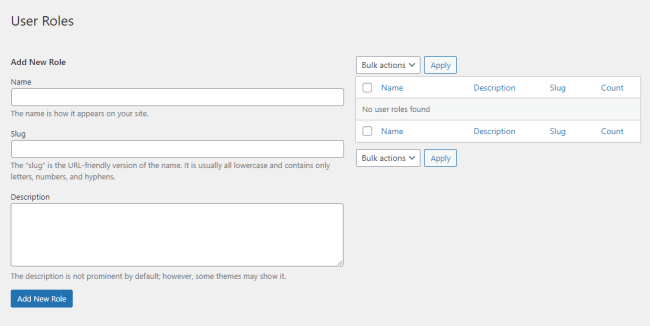
- On the left side of the page, yous tin Add New Function.
- Enter the Proper name of the user role.
- Enter the Slug of the user role.
- Enter the Description of the user role.
- One time washed, click on the Add New Role button.
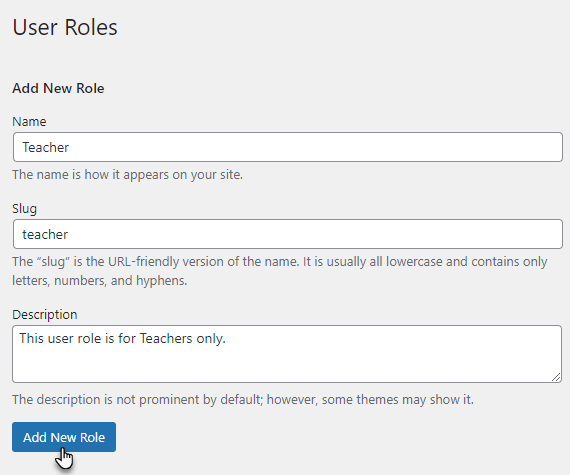
- One time the User Role is successfully added, it will announced on the right side of the folio.
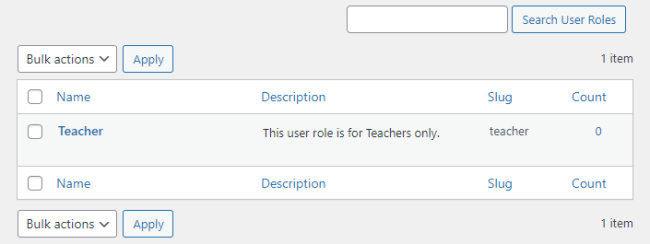
- Hover over the user role to view the suboptions.

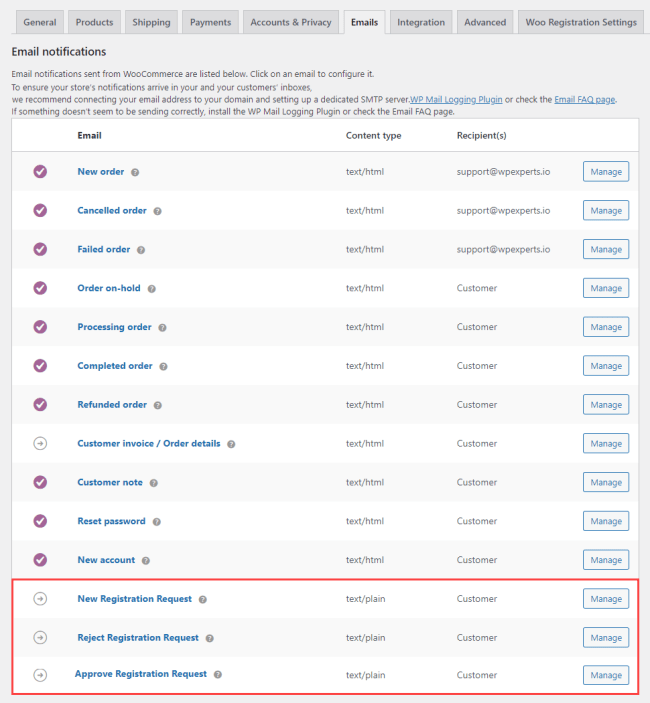
Notification ↑ Dorsum to top
- Navigate to WordPress Admin Dashboard → WooCommerce → Notification.

- The Admin and User received the notification via e-mail.
- Once you're on the Email tab, you'll see 3 settings on this page.
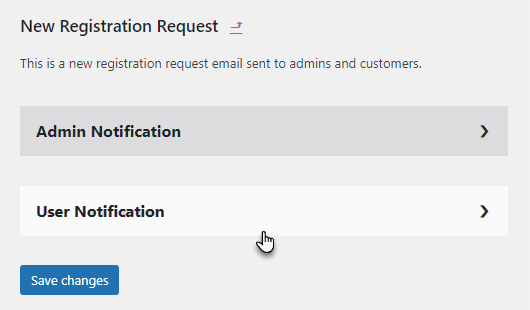
- New Registration Asking
- Request Registration Rejection
- Request Registration Approval
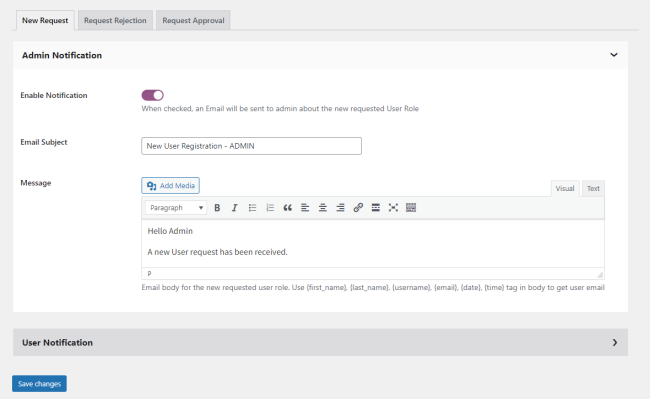
A. New Request ↑ Back to meridian
- Navigate to the New Registration Asking settings. (The Admin will be redirected on the New Registration Asking tab by default when yous're on the Email Tab).
- There are ii accordions in this tab.
- Admin Notification
- Click on the Admin Notification accordion to expand it.

- Enable the Enable Notification toggle button to send an email to the Admin about the new requested user function.
- Set the Email Field of study.
- Set the Bulletin.
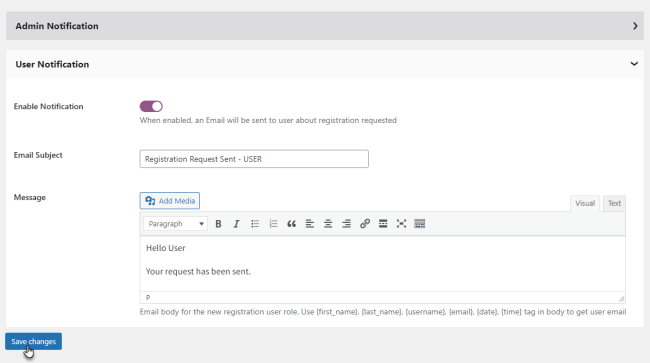
ii. User Notification
- Click on the User Notification accordion to expand it.
- Enable the Enable Notification toggle button to send the user an email most the registration requested.
- Prepare the E-mail Subject.
- Set the Message.
- Click on the Save changes button to employ your settings.
B. Request Registration Rejection ↑ Dorsum to top
- Navigate to the Asking Registration Rejection Setting.
- There is only one squeeze box in this tab.
- Request Rejection Notification
- Enable the Enable Notification toggle push to send the user an email about the new requested user function.
- Gear up the Email Subject field.
- Set the Message.
- Click on the Salve changes push to apply your settings.

C. Approve Registration Request ↑ Back to tiptop
- Navigate to the Approve Registration Request Settings.
- There is just i accordion in this tab.
- Asking Approval Notification
- Enable the Enable Notification toggle button to transport the user an email about the new requested user role.
- Set the Email Bailiwick.
- Prepare the Message.
- Click on the Salvage changes button to apply your settings.

Settings ↑ Back to summit
- Navigate to WordPress Admin Dashboard → WooCommerce → Settings.

- Once you're on the Settings folio, you'll see Woo Registration Settings tab on this folio.
- At that place are Five subtabs inside the Woo Registration Settings tab.
- General Settings
- User Settings
- User Approval
- Notifications
- Display

A. General ↑ Back to top
- Navigate to the General subtab. (The Admin volition be redirected on the General subtab by default when y'all're in the Woo Registration Settings tab).
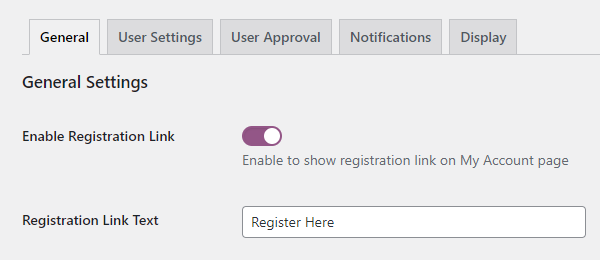
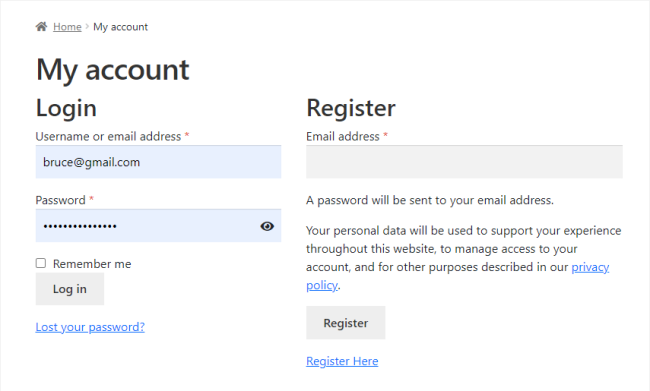
- Enable Registration Link
- Enable the Enable Registration Link toggle button on the My Business relationship page to show a registration link.
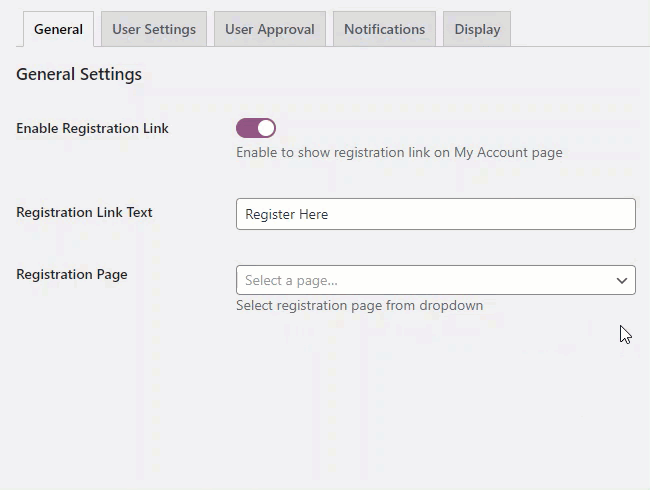
- Once done, two more options volition appear.
1.1 Registration Link Text
- Enter the Text for the registration link in the textbox.
ane.ii Registration Page
- Select the Registration page to exist redirected when the user clicks on the Registration Link on the My Account page.
Front-Terminate Touch:
- Go to the website.
- Go to the My Business relationship page.
- On the My Account page, a Registration Link volition be mentioned.
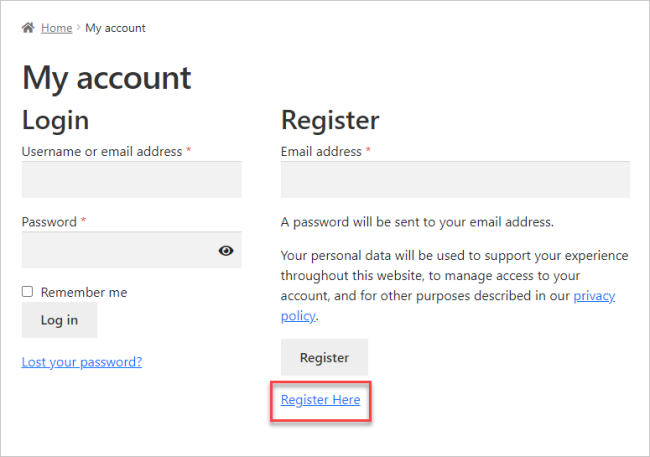
- Click on the Registration Link.
- The user will be redirected to the page configured in the Registration Folio selection.

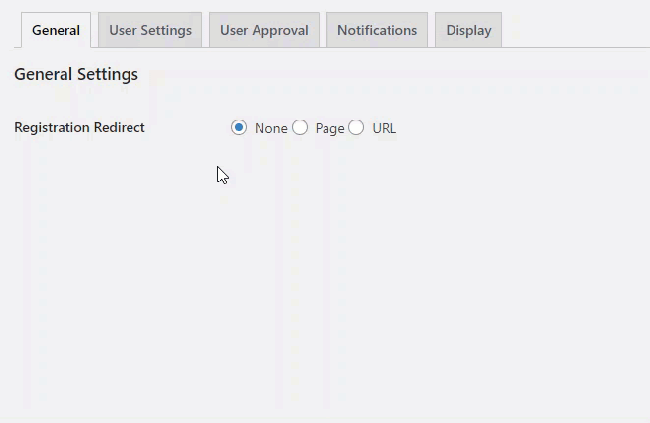
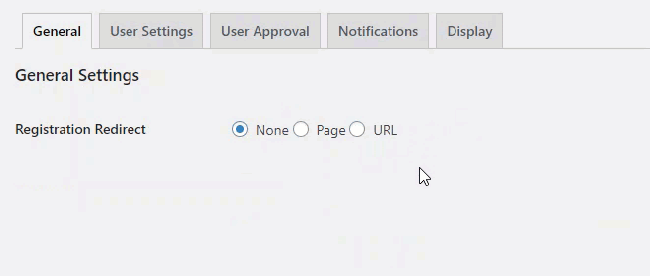
2. Registration Redirect
- This selection will allow you to redirect the user when the user clicks the Annals button.
- At that place are three sub-options bachelor;
- None
- Folio
- URL
two.ane None
- Select the None radio button if you don't desire to redirect the user anywhere.

ii.2 Page
- Select the Page radio button to redirect the user to a page.
- One time washed, an option volition appear titled Select Page.
- Select the folio from the dropdown carte du jour.
Front-Stop Impact:
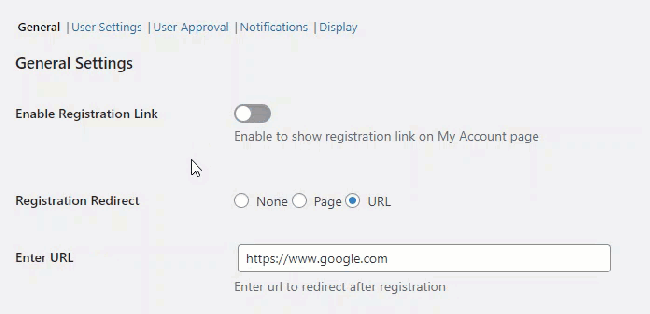
2.three URL
- Select the Page radio button to redirect the user to a URL.
- In one case done, an selection will announced titled Enter URL.
- Enter the respective URL in the textbox.
Front end-Stop Impact:
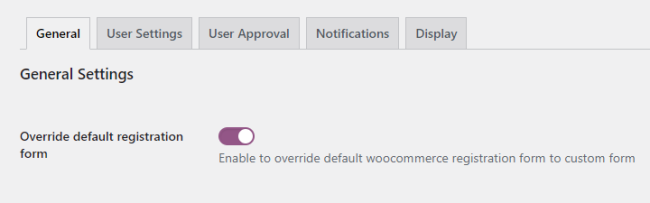
three. Override default registration course
- Enable the toggle button to override the default woocommerce registration class to the custom form.
iv. Disable Prove Password
- Enable the toggle push button to hide the password icon for hide/ show password.

Front-End Impact:
Before:
- When the toggle push button is disabled, the hide password icon is visible in the password textbox.
After:
- The password icon is hidden in the password textbox when the toggle button is enabled.
five. Remove Data
- Checkmark the checkbox to remove all user registration data upon plugin deletion.
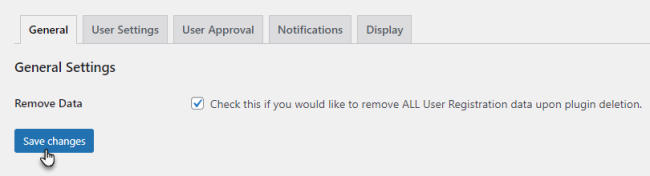
- Click on the Save changes button to utilize your settings.
B. User Settings ↑ Back to tiptop
- Navigate to the User Settings subtab.
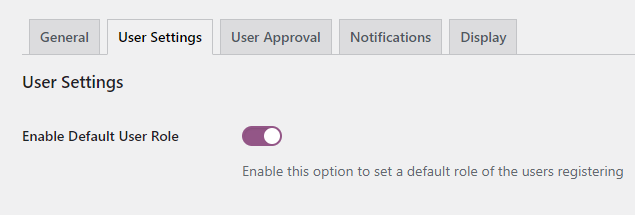
- Enable Default User Part
- Enable the Enable Default User Office toggle button to set a default user office for registering users.
ii. Select User Role
- Enable the Enable Default User Role toggle button to set a default user function for registering users.

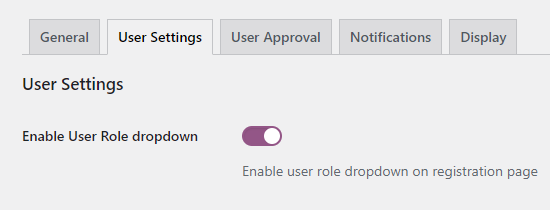
3. Select User Role
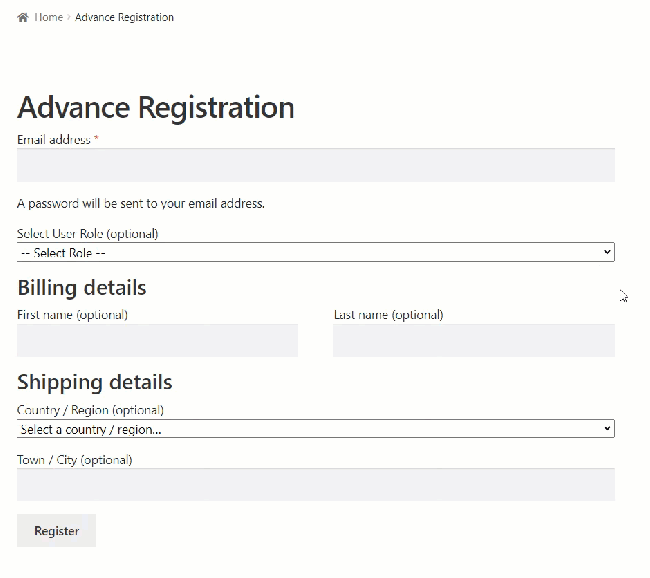
- Enable the Enable Default Role dropdown option to display the user roles on the User Registration page for the registered users.
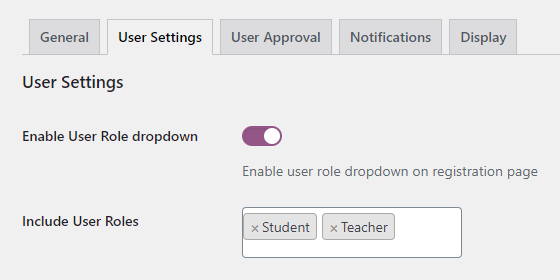
4. Include User Roles
- In this option, select the User Roles from the dropdown carte du jour displayed on the User Registration page.
Front-Finish Impact:
Note: If no User Function is selected in the Include User Roles option, then no User Role will be displayed on the User Registration page.
5. Display on Checkout page
- Checkmark the checkbox to display the user roles dropdown listing on the Checkout page for the registered users.
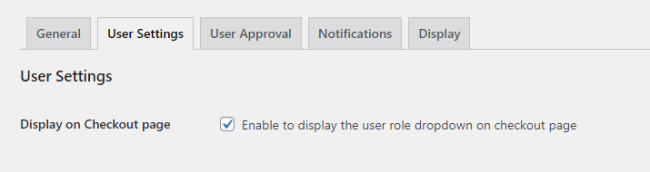
Front-Terminate Impact:
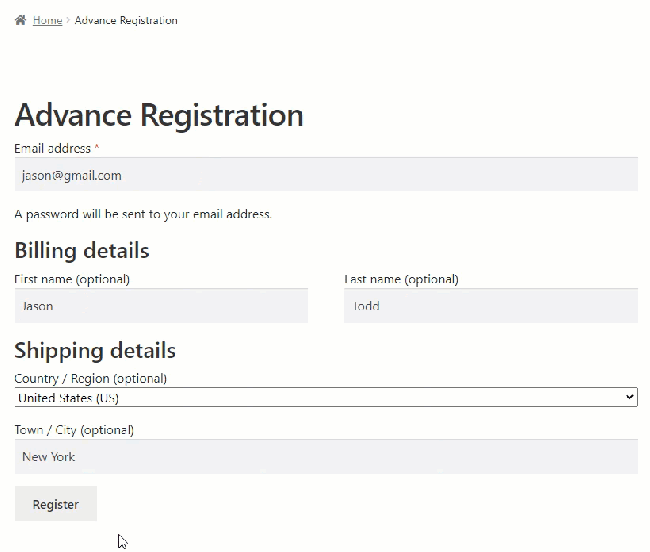
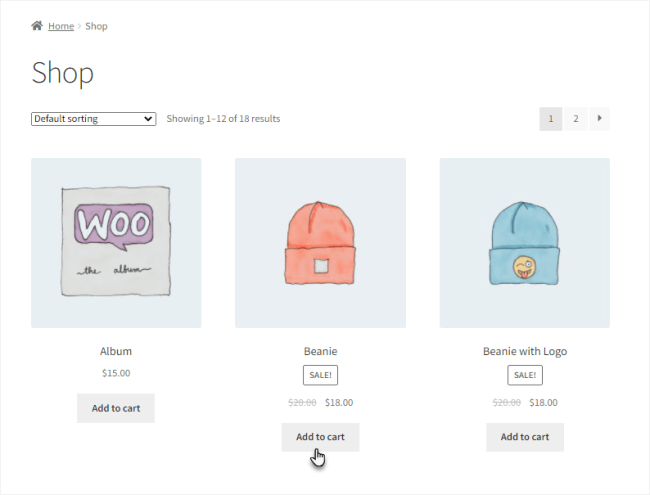
- A guest user will go to the Store page on the website.
- Click on the Add to Cart button against any production.
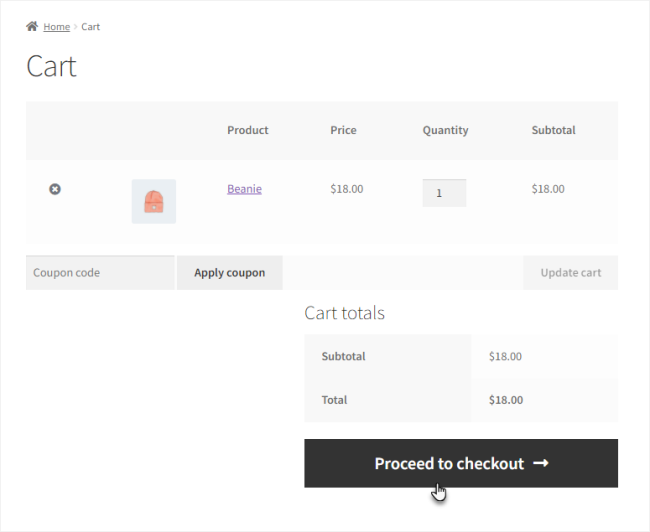
- Now become to the Cart page.
- On the Cart page, click on the Proceed to checkout push button to go to the Checkout page.
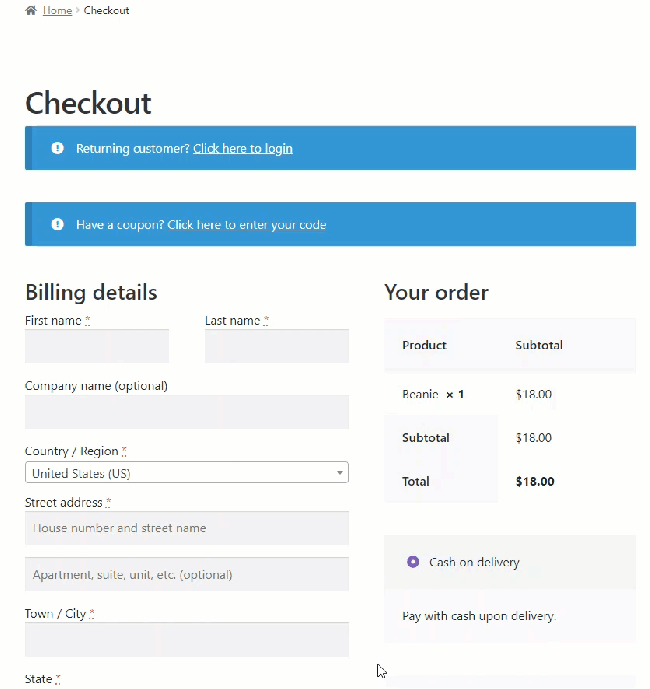
- Once you're on the Checkout page, there's a Create an account checkbox at the bottom of the page.
- Checkmark the Create an business relationship checkbox, an pick will appear Select User Part.
6. Display on My Account
- Checkmark the checkbox to display the user roles dropdown list on the My Account folio for registering users.
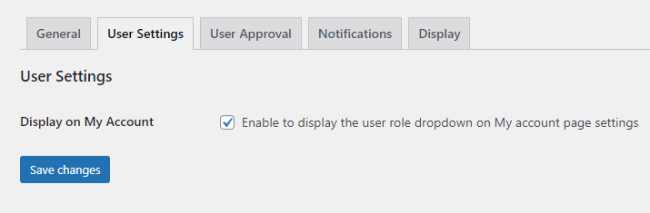
Front-End Impact:
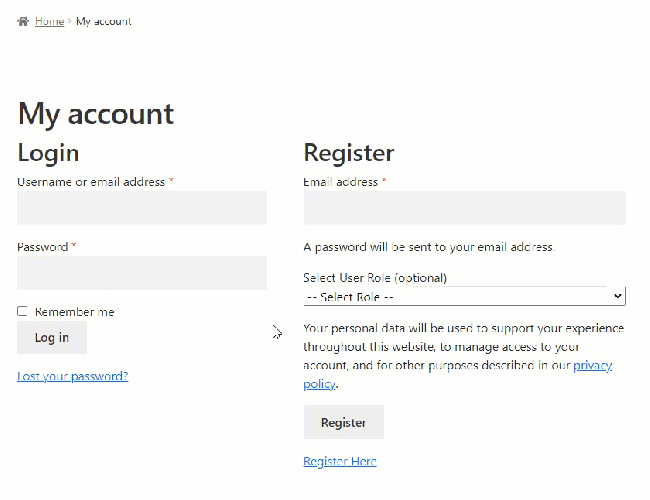
- A guest user will go to the My Account page on the website.
- An pick will announced, Select User Role in the Register section.
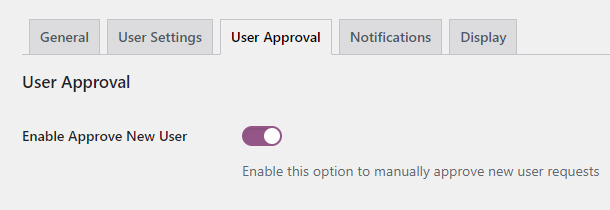
C. User Approval ↑ Back to height
- Navigate to the User Approval subtab.
- Enable Approve New User
- Enable the Enable Approve New User toggle button to approve new user requests manually.
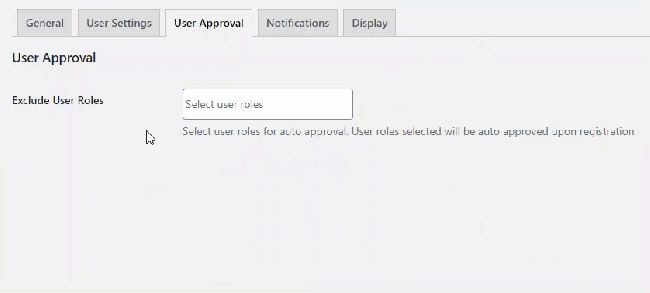
2. Exclude User Roles
- In this choice, select the user roles from the dropdown menu.Those User Roles selected in this option volition be auto-approved upon registration.
3. Custom message for account created
- Prepare the custom message on blessing of the new user role asking.
4. Custom message for pending request
- Set the custom bulletin on awaiting request.
five. Custom message for rejected request
- Set the custom message on the rejection of the new user role request.

- Click on the Relieve changes button to apply your settings.
D. Notification ↑ Back to top
- Navigate to the Notification subtab.
- Notification emails are sent to the site admin when a user needs to exist updated.
- Transport notification emails to all admins
- Enable the Send notification emails to all admins toggle push button to ship the notification email to all users with admin access.
- The default settings will be that only the site Administrator will notify a user awaiting approval.

ii. Send admin notification emails to specific users
- Enable the Ship admin notification emails to specific users toggle button to send the email notification to specific users selected in the dropdown bill of fare.
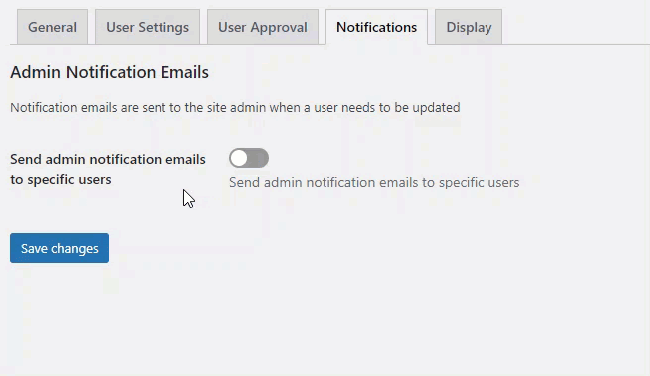
- You can besides add more than 1 user.
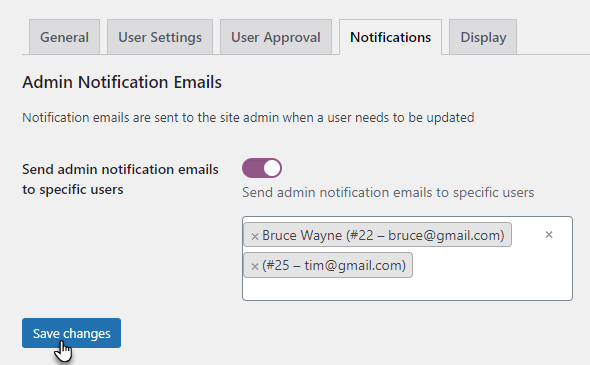
- Click on the Salve changes button to employ your settings.
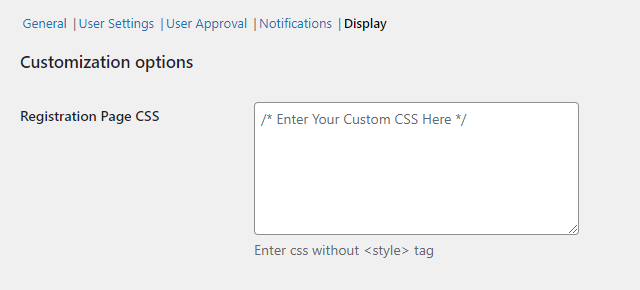
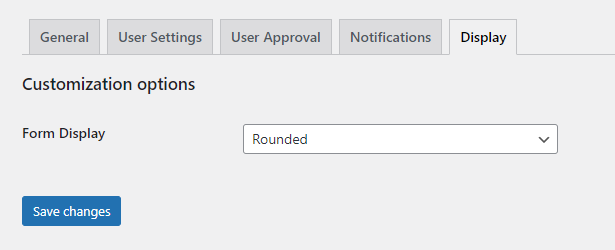
Eastward. Display ↑ Dorsum to top
- Navigate to the Brandish subtab.
- Admin can add together Custom CSS for User Registration.
- Registration Page CSS
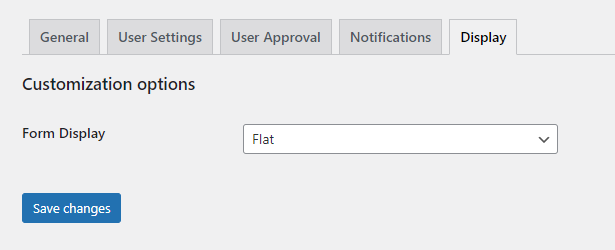
2. Class Display
- There are two types of form display types available.
- Flat
- Round
2.ane Flat
- When the Flat option is selected as the form display type.
Front end-Stop Affect:

2.2 Round
- When the Circular option is selected as form display blazon.
Front-End Bear upon:

Requests ↑ Back to superlative
- Navigate to WordPress Admin Dashboard → Users → Requests.
- All the manual requests will announced on the Registration Requests page.
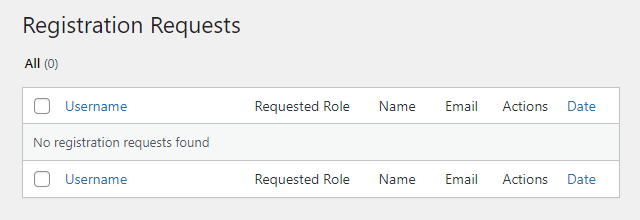
- All the manual requests volition announced on the Registration Requests page.
- The user volition go to the User Registration page.
- The user volition enter the required fields and credentials.
- One time done, the user will click on the Register button.

ane. Awaiting Request ↑ Back to meridian
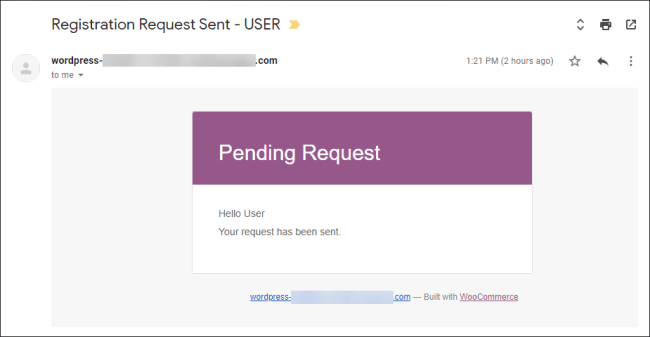
- An e-mail will be launched once the user clicks the Register button and sent to the User and the Administrator.
i.i Pending Request – User:
1.2 Awaiting Request – Ambassador:
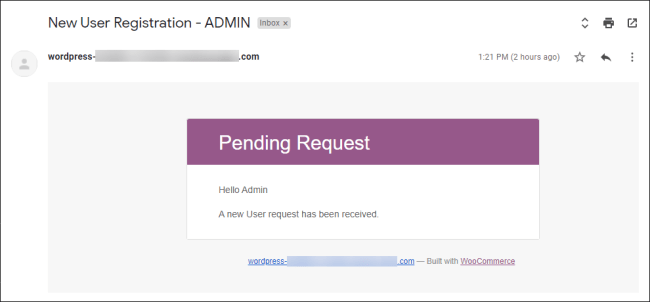
- At present on the Registration Requests folio, the Admin will receive the request of that particular user.
- A notification will also appear on the WP Panel against the Request option.
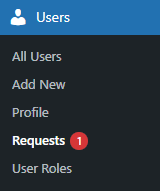
- The user will be in the Awaiting section on the Registration Requests folio.
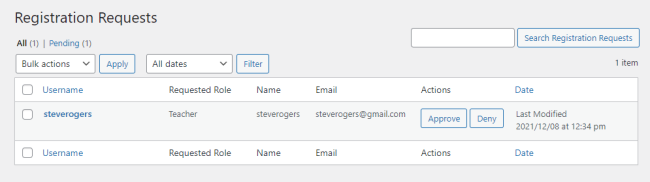
two. Approve Asking ↑ Dorsum to top
- The Admin will click on the Approve push.

- Once done, the user volition be moved to the Approved section on the Registration Requests page.
- As well, an email will exist sent to the User regarding the Blessing of their request.
2.1 Blessing Asking – User:

3. Reject Request ↑ Dorsum to superlative
- The Admin will click on the Deny push button.
- In one case done, the user will be moved to the Denied section on the Requests page.
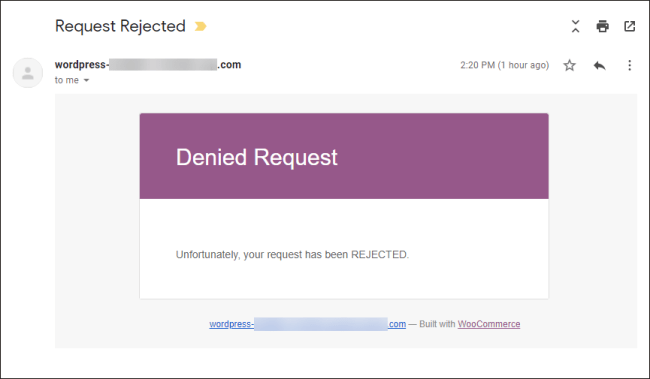
- Too, an email will be sent to the User regarding the Rejection of their request.
3.1 Rejected Asking – User:

Where Do I Find A Listing Of Registed Accounts In Woocommerce?,
Source: https://woocommerce.com/document/user-registration-for-woocommerce/
Posted by: jenningsramord94.blogspot.com
0 Response to "Where Do I Find A Listing Of Registed Accounts In Woocommerce?"
Post a Comment